RV Solar Power: Going Off-Grid and Saving Money
Understanding RV Solar Power Systems The Basics
So you're thinking about RV solar power That's awesome It's a game changer for freedom and your wallet But where do you even start Let's break down the basics of RV solar systems in a way that's easy to understand Think of it as a crash course in sunshine harvesting for your home on wheels
What is RV Solar Power Anyway
At its heart RV solar power is about using solar panels to convert sunlight into electricity This electricity is then stored in batteries and used to power your RV's appliances lights and electronics It's like having your own mini power plant riding along with you
Key Components of an RV Solar System
An RV solar system isn't just solar panels It's a whole team of components working together Here's a quick rundown:
- Solar Panels: These are the workhorses converting sunlight into DC electricity. We'll talk about different types later.
- Charge Controller: This regulates the power coming from the solar panels to safely charge your batteries. It prevents overcharging, which can damage your batteries.
- Batteries: This is where you store the electricity generated by your solar panels. Common types include lead-acid, AGM, and lithium.
- Inverter: This converts the DC electricity from your batteries into AC electricity, which is what most of your RV appliances use.
- Wiring and Fuses: These connect all the components and protect the system from overloads.
- Mounting Hardware: This secures the solar panels to your RV's roof.
How Does an RV Solar System Work Step by Step
Let's walk through how an RV solar system actually works:
- Sunlight hits the solar panels.
- The solar panels convert sunlight into DC electricity.
- The DC electricity flows to the charge controller.
- The charge controller regulates the voltage and current to safely charge the batteries.
- The batteries store the electricity.
- When you need power, you draw it from the batteries.
- If you need AC power (like for your microwave), the inverter converts the DC power from the batteries into AC power.
DC vs AC Power Understanding the Difference
You'll hear a lot about DC and AC power when talking about RV solar systems. Here's the difference:
- DC (Direct Current): Electricity flows in one direction. Batteries and solar panels produce DC power.
- AC (Alternating Current): Electricity flows in both directions. This is the type of power that comes from your wall outlets at home.
Your RV probably uses both DC and AC appliances. Lights, fans, and some smaller electronics often run on DC power. Appliances like microwaves, air conditioners, and TVs typically require AC power.
Choosing the Right RV Solar Panels for Your Needs
Choosing the right solar panels is crucial for a successful RV solar setup. There are several factors to consider, including the type of solar panel, its wattage, and its size. Let's dive into the options.
Types of RV Solar Panels Monocrystalline Polycrystalline and Thin Film
There are three main types of solar panels commonly used in RV applications:
- Monocrystalline Solar Panels: These are made from a single crystal of silicon. They are the most efficient type of solar panel, meaning they produce the most power per square foot. They are also the most expensive.
- Polycrystalline Solar Panels: These are made from multiple silicon crystals. They are less efficient than monocrystalline panels but are also less expensive.
- Thin-Film Solar Panels: These are made by depositing a thin layer of photovoltaic material onto a substrate. They are the least efficient type of solar panel but are also the most flexible and lightweight. They are often used in portable solar chargers.
Monocrystalline vs Polycrystalline A Detailed Comparison
Let's compare monocrystalline and polycrystalline panels side-by-side:
| Feature | Monocrystalline | Polycrystalline |
|---|---|---|
| Efficiency | Higher (17-22%) | Lower (15-17%) |
| Appearance | Uniform black color | Blueish, speckled appearance |
| Performance in Low Light | Slightly better | Slightly worse |
| Price | More expensive | Less expensive |
| Lifespan | Generally longer | Generally slightly shorter |
Recommendation: For most RV applications, monocrystalline panels are the best choice due to their higher efficiency. If budget is a major concern, polycrystalline panels can be a viable alternative.
Understanding Solar Panel Wattage Voltage and Amperage
These terms can be confusing, but understanding them is essential for designing your RV solar system:
- Wattage (W): This is the amount of power a solar panel can produce under ideal conditions. Higher wattage panels produce more power.
- Voltage (V): This is the electrical potential difference. You need to match the voltage of your solar panels to the voltage of your charge controller and batteries.
- Amperage (A): This is the amount of electrical current flowing through the circuit.
The relationship between these three is expressed by the formula: Watts = Volts x Amps
When choosing solar panels, pay attention to their voltage and amperage ratings to ensure they are compatible with your other components.
Solar Panel Size and Space Considerations for RV Roofs
RV roofs have limited space, so you need to choose solar panels that fit your available area. Consider the dimensions of the panels and how many you can realistically fit on your roof. Flexible solar panels can sometimes conform to curved surfaces, offering more placement options.
Best RV Solar Panel Brands and Models in the Market
Here are a few reputable RV solar panel brands and models:
- Renogy: Known for their affordable and reliable solar panels. The Renogy 100 Watt 12 Volt Monocrystalline Solar Panel is a popular choice.
- Go Power!: Offers high-quality solar panels and complete solar kits. The Go Power! Overlander Solar Kit is a great option for beginners.
- Grape Solar: Provides a range of solar panels for various applications. The Grape Solar 100-Watt Monocrystalline Solar Panel is a solid choice.
- Newpowa: Known for durable and efficient panels. Newpowa 210W Monocrystalline panels offer a good balance of power and size.
Example: The Renogy 100 Watt 12 Volt Monocrystalline Solar Panel typically costs around $100-$120. It's a good starting point for a small RV or van. Consider buying multiple panels to increase your power output.
RV Solar Charge Controllers Optimizing Battery Charging
The charge controller is a critical component of your RV solar system. It regulates the power flowing from the solar panels to your batteries, preventing overcharging and extending battery life. Let's explore the different types of charge controllers and how to choose the right one.
PWM vs MPPT Charge Controllers Which is Right for You
There are two main types of charge controllers:
- PWM (Pulse Width Modulation) Charge Controllers: These are the simpler and less expensive type. They work by directly connecting the solar panels to the batteries, switching on and off rapidly to regulate the voltage.
- MPPT (Maximum Power Point Tracking) Charge Controllers: These are more sophisticated and efficient. They actively track the maximum power point of the solar panels and convert the excess voltage into amperage, maximizing the amount of power delivered to the batteries.
MPPT Charge Controllers Advantages and Benefits
MPPT charge controllers offer several advantages over PWM controllers:
- Higher Efficiency: MPPT controllers can be up to 30% more efficient than PWM controllers, especially in cooler weather.
- More Flexible Panel Configurations: MPPT controllers allow you to use higher voltage solar panels, which can simplify wiring and reduce voltage drop.
- Better Performance in Low Light: MPPT controllers can extract more power from solar panels in low light conditions.
Recommendation: For most RV solar installations, an MPPT charge controller is the best choice due to its higher efficiency and flexibility. While they are more expensive, the increased power output and battery lifespan make them a worthwhile investment.
Calculating Charge Controller Size and Capacity
To choose the right size charge controller, you need to calculate the maximum current your solar panels can produce. Here's the formula:
Charge Controller Amperage Rating = (Total Solar Panel Wattage / Battery Voltage) x 1.25
The 1.25 factor is a safety margin to account for potential variations in solar panel output.
Example: If you have 400 watts of solar panels and a 12-volt battery system, the minimum charge controller amperage rating would be: (400 / 12) x 1.25 = 41.67 amps. You would need a charge controller rated for at least 42 amps.
Top RV Solar Charge Controller Brands and Models
Here are some popular RV solar charge controller brands and models:
- Victron Energy: Known for their high-quality and reliable charge controllers. The Victron SmartSolar MPPT 100/30 is a popular choice.
- Morningstar: Offers a range of charge controllers for various applications. The Morningstar ProStar 15 is a solid PWM controller.
- Renogy: Provides affordable and reliable charge controllers. The Renogy Rover 40 Amp MPPT Charge Controller is a good value.
- Epever: Offers cost-effective solutions. Epever Tracer AN series are popular for their features and price point.
Example: The Victron SmartSolar MPPT 100/30 typically costs around $200-$250. It's a great choice for small to medium-sized RV solar systems. It also features Bluetooth connectivity for monitoring and configuration.
RV Batteries Powering Your Off-Grid Adventures
Batteries are the heart of your RV solar system, storing the electricity generated by your solar panels. Choosing the right type and size of batteries is crucial for ensuring you have enough power to meet your needs. Let's explore the different types of RV batteries and how to select the best ones for your setup.
Lead Acid AGM and Lithium Batteries A Comparison
There are three main types of batteries commonly used in RV solar systems:
- Lead-Acid Batteries: These are the most affordable type of battery. They are heavy and require regular maintenance, such as adding distilled water. They also have a limited depth of discharge (typically 50%).
- AGM (Absorbent Glass Mat) Batteries: These are a type of lead-acid battery that is sealed and maintenance-free. They are more expensive than flooded lead-acid batteries but offer better performance and longer lifespan. They also have a slightly better depth of discharge (around 60-70%).
- Lithium Batteries: These are the most expensive type of battery but offer the best performance. They are lightweight, have a long lifespan, and can be discharged to a much greater depth (typically 80-90%).
Lithium Batteries Advantages and Disadvantages
Lithium batteries offer several advantages over lead-acid and AGM batteries:
- Higher Energy Density: Lithium batteries store more energy per pound than lead-acid or AGM batteries.
- Longer Lifespan: Lithium batteries can last for thousands of cycles, compared to hundreds of cycles for lead-acid batteries.
- Deeper Depth of Discharge: Lithium batteries can be discharged to a much greater depth without damaging the battery.
- Faster Charging: Lithium batteries can be charged much faster than lead-acid batteries.
- Lighter Weight: Lithium batteries are significantly lighter than lead-acid batteries.
However, lithium batteries also have some disadvantages:
- Higher Cost: Lithium batteries are significantly more expensive than lead-acid or AGM batteries.
- Temperature Sensitivity: Lithium batteries can be damaged by extreme temperatures.
- Require a Compatible Charger: Lithium batteries require a charger specifically designed for lithium batteries.
Recommendation: If budget is not a major concern, lithium batteries are the best choice for RV solar systems due to their superior performance and lifespan. If budget is a constraint, AGM batteries offer a good compromise between performance and price.
Calculating Battery Bank Size for Your RV Needs
To determine the appropriate battery bank size, you need to estimate your daily power consumption. Here's how:
- List all the appliances and devices you will be using in your RV.
- Determine the wattage of each appliance.
- Estimate how many hours per day you will be using each appliance.
- Calculate the daily energy consumption for each appliance (Wattage x Hours).
- Add up the daily energy consumption for all appliances to get your total daily energy consumption in watt-hours.
- Divide the total daily energy consumption by the battery voltage to get your daily amp-hour consumption.
- Multiply the daily amp-hour consumption by the desired days of autonomy (how many days you want to be able to run without sun).
- Divide the result by the battery's depth of discharge (e.g., 0.5 for lead-acid, 0.8 for lithium) to get the required battery bank capacity.
Example: Let's say you estimate your daily energy consumption to be 1000 watt-hours, and you have a 12-volt battery system. Your daily amp-hour consumption would be 1000 / 12 = 83.33 amp-hours. If you want 2 days of autonomy and are using lithium batteries (80% depth of discharge), the required battery bank capacity would be (83.33 x 2) / 0.8 = 208.33 amp-hours. You would need at least 208 amp-hours of battery capacity.
Best RV Battery Brands and Models
Here are some popular RV battery brands and models:
- Battle Born Batteries: Known for their high-quality lithium batteries. The Battle Born 100Ah 12V LiFePO4 Deep Cycle Battery is a popular choice.
- Renogy: Offers a range of batteries for various applications. The Renogy 100Ah 12V Lithium Iron Phosphate Battery is a good value.
- Lifeline Batteries: Known for their high-quality AGM batteries. The Lifeline GPL-4CT is a popular choice.
- Trojan Battery: Offers a range of lead-acid batteries. The Trojan T-105 is a classic choice for RVs.
- Sok Battery: Offers cost effective lithium options. SOK 100Ah 12V LiFePO4 batteries offer robust performance at a competitive price.
Example: The Battle Born 100Ah 12V LiFePO4 Deep Cycle Battery typically costs around $900-$1000. It's a premium choice for RVers who want the best performance and lifespan.
RV Solar Inverters Converting DC to AC Power
An inverter converts the DC power stored in your batteries into AC power, which is what most of your RV appliances use. Choosing the right inverter is essential for ensuring you can power all your devices. Let's explore the different types of RV solar inverters and how to select the best one for your needs.
Pure Sine Wave vs Modified Sine Wave Inverters
There are two main types of inverters:
- Pure Sine Wave Inverters: These produce a clean, smooth AC waveform that is identical to the power you get from your wall outlets at home. They are the best choice for sensitive electronics, such as laptops, TVs, and audio equipment.
- Modified Sine Wave Inverters: These produce a less smooth AC waveform that is a stepped approximation of a sine wave. They are less expensive than pure sine wave inverters but can cause problems with some sensitive electronics.
Pure Sine Wave Inverters Advantages and Applications
Pure sine wave inverters offer several advantages over modified sine wave inverters:
- Better Compatibility: Pure sine wave inverters are compatible with a wider range of appliances and devices.
- Quieter Operation: Pure sine wave inverters typically run quieter than modified sine wave inverters.
- Longer Appliance Lifespan: Pure sine wave inverters can help extend the lifespan of your appliances by providing cleaner power.
Recommendation: For most RV applications, a pure sine wave inverter is the best choice due to its better compatibility and performance. While they are more expensive, the peace of mind and extended appliance lifespan make them a worthwhile investment.
Calculating Inverter Size and Power Requirements
To choose the right size inverter, you need to calculate the total wattage of all the appliances you will be running simultaneously. Here's how:
- List all the appliances you will be running at the same time.
- Determine the wattage of each appliance.
- Add up the wattage of all the appliances to get your total wattage requirement.
- Choose an inverter that has a continuous power rating that is greater than or equal to your total wattage requirement.
- Also, consider the surge capacity of the inverter. Some appliances, such as air conditioners and refrigerators, require a surge of power to start up. Make sure the inverter has a surge capacity that is high enough to handle these appliances.
Example: Let's say you want to run a microwave (1000 watts), a TV (100 watts), and a laptop (50 watts) at the same time. Your total wattage requirement would be 1000 + 100 + 50 = 1150 watts. You would need an inverter with a continuous power rating of at least 1200 watts. You would also need to check the surge capacity of the inverter to make sure it can handle the startup surge of the microwave.
Top RV Solar Inverter Brands and Models
Here are some popular RV solar inverter brands and models:
- Victron Energy: Known for their high-quality and reliable inverters. The Victron MultiPlus Compact 2000VA is a popular choice.
- Magnum Energy: Offers a range of inverters for various applications. The Magnum MS2000 is a solid choice.
- Renogy: Provides affordable and reliable inverters. The Renogy 2000W Pure Sine Wave Inverter is a good value.
- AIMS Power: Offers a variety of inverters. The AIMS Power 3000 Watt Pure Sine Inverter is a popular choice for higher power needs.
Example: The Victron MultiPlus Compact 2000VA typically costs around $1000-$1200. It's a premium choice for RVers who want the best performance and reliability. It also includes a built-in charger and transfer switch.
RV Solar System Installation Tips and Best Practices
Installing an RV solar system can be a challenging but rewarding project. Proper installation is crucial for ensuring the system operates safely and efficiently. Let's explore some essential installation tips and best practices.
Safety Precautions Before Starting the Installation
Before you begin, safety should be your top priority. Follow these precautions:
- Disconnect the RV's shore power and any generators.
- Wear appropriate safety gear, such as gloves and eye protection.
- Work in a well-ventilated area.
- Double-check all wiring connections before energizing the system.
- Consult a qualified electrician if you are unsure about any aspect of the installation.
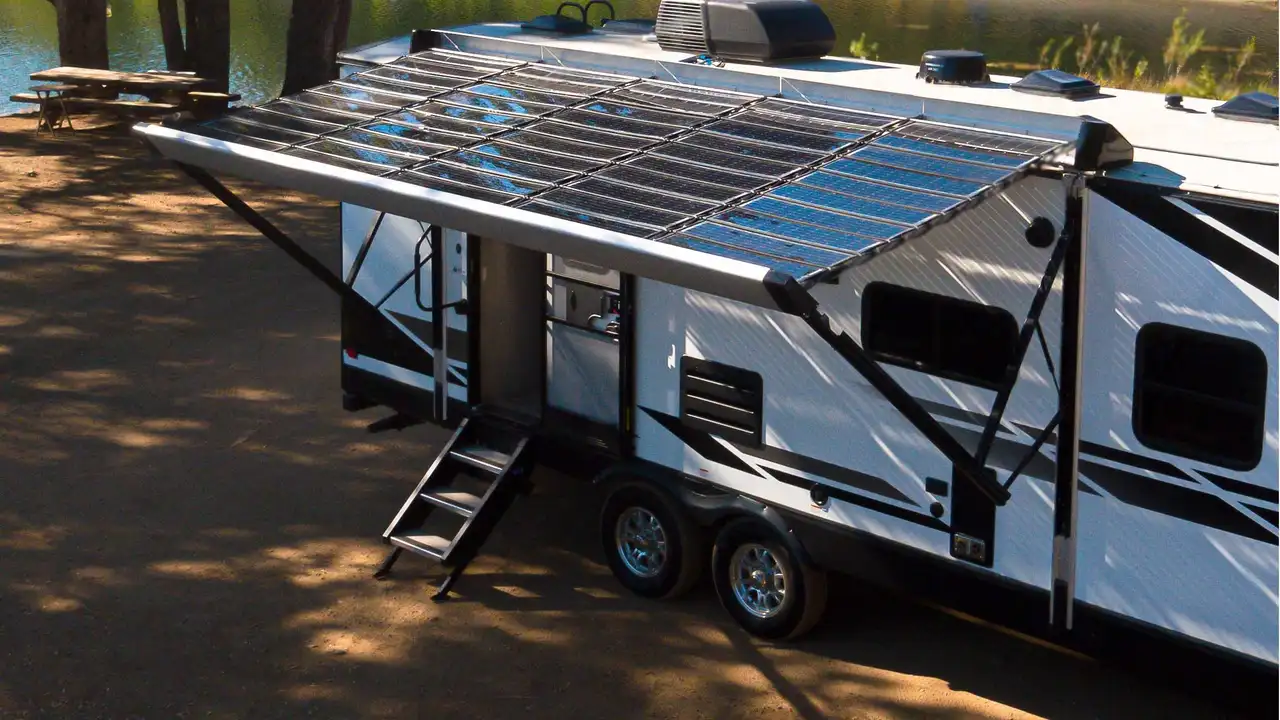
Mounting Solar Panels Securely on the RV Roof
Securely mounting the solar panels to the RV roof is essential to prevent them from coming loose during travel. Here are some tips:
- Use appropriate mounting hardware designed for RV roofs.
- Ensure the mounting hardware is compatible with your solar panels and RV roof material.
- Use sealant to prevent water leaks around the mounting hardware.
- Consider using aerodynamic fairings to reduce wind resistance and noise.
- Regularly inspect the mounting hardware for any signs of damage or loosening.
Wiring and Cable Management for a Clean Installation
Proper wiring and cable management are essential for a safe and efficient solar system. Here are some tips:
- Use appropriately sized wires for the current carrying capacity.
- Use color-coded wires to identify positive and negative connections.
- Protect wires from abrasion and damage by using conduit or cable ties.
- Keep wires away from sharp edges and hot surfaces.
- Use fuses or circuit breakers to protect the system from overloads.
- Properly ground the system to prevent electrical shock.
Connecting Solar Panels Charge Controller Batteries and Inverter
Connecting the various components of the solar system in the correct order is crucial. Here's a general guide:
- Connect the solar panels to the charge controller.
- Connect the charge controller to the batteries.
- Connect the inverter to the batteries.
- Follow the manufacturer's instructions for each component.
- Double-check all connections before energizing the system.
Testing and Troubleshooting Your RV Solar System
After installation, it's important to test and troubleshoot the system to ensure it's working properly. Here are some tips:
- Use a multimeter to check the voltage and current at various points in the system.
- Monitor the battery voltage and charging status.
- Test all appliances to ensure they are working properly.
- Check for any signs of overheating or unusual noise.
- If you encounter any problems, consult the manufacturer's documentation or a qualified electrician.
Professional RV Solar Installation vs DIY Considerations
Deciding whether to hire a professional or install the system yourself depends on your skills and experience. Here are some considerations:
- DIY: If you have experience with electrical wiring and are comfortable working on your RV's roof, you may be able to install the system yourself. This can save you money on labor costs.
- Professional: If you are not comfortable with electrical wiring or are unsure about any aspect of the installation, it's best to hire a professional. This will ensure the system is installed safely and correctly.
Cost Comparison: A DIY installation may cost $1000-$3000 depending on the size of the system. A professional installation may cost $3000-$6000 or more, depending on the complexity of the installation.
RV Solar System Maintenance and Longevity
Proper maintenance is essential for extending the lifespan of your RV solar system. Let's explore some key maintenance tasks and best practices.
Cleaning Solar Panels for Optimal Performance
Dust, dirt, and debris can reduce the efficiency of your solar panels. Clean them regularly with a soft brush and mild soap and water. Avoid using harsh chemicals or abrasive cleaners.
Battery Maintenance Tips for Extended Lifespan
Battery maintenance varies depending on the type of battery:
- Lead-Acid Batteries: Regularly check the water level and add distilled water as needed. Clean the terminals to prevent corrosion.
- AGM Batteries: These are maintenance-free, but you should still check the terminals for corrosion.
- Lithium Batteries: These are also maintenance-free, but you should monitor the battery voltage and temperature.
Checking Wiring Connections and Preventing Corrosion
Regularly inspect wiring connections for any signs of loosening or corrosion. Clean corroded terminals with a wire brush and apply a corrosion inhibitor.
Monitoring System Performance and Identifying Issues
Monitor the system's performance regularly to identify any issues early on. Check the battery voltage, charging status, and inverter output. Use a solar monitoring system to track the system's performance over time.
Protecting Your System from Extreme Weather Conditions
Protect your solar system from extreme weather conditions, such as hail, snow, and high winds. Consider using protective covers or storing the system indoors during severe weather.
RV Solar Power Case Studies and Success Stories
Let's look at some real-world examples of how RV solar power can transform your off-grid adventures.
Case Study 1 The Full Time RVer Living Off Grid
John and Mary are full-time RVers who travel the country in their 30-foot Class C motorhome. They installed a 600-watt solar system with lithium batteries and a pure sine wave inverter. This allows them to live completely off-grid, powering their lights, appliances, and electronics without relying on shore power or generators. They estimate they save thousands of dollars per year on campground fees and fuel costs.
Case Study 2 The Weekend Warrior Enhancing Camping Experiences
Sarah and Tom are weekend campers who enjoy boondocking in remote locations. They installed a 200-watt portable solar system with an AGM battery and a modified sine wave inverter. This allows them to power their lights, fans, and charge their phones and laptops without relying on a generator. They find that the solar system enhances their camping experiences by providing them with more comfort and convenience.
Case Study 3 Van Life Adventure and Sustainable Travel
Emily is a van life enthusiast who travels the world in her converted Sprinter van. She installed a 400-watt solar system with lithium batteries and a pure sine wave inverter. This allows her to live sustainably and reduce her carbon footprint while exploring new places. She uses the solar system to power her lights, refrigerator, cooking appliances, and electronics.
RV Solar Power The Future of Off Grid Living
RV solar power is becoming increasingly popular as more people embrace off-grid living and sustainable travel. As technology advances and costs decrease, solar power will become even more accessible and affordable.
Emerging Trends in RV Solar Technology
Here are some emerging trends in RV solar technology:
- More Efficient Solar Panels: Solar panel efficiency is constantly improving, allowing for more power output from smaller panels.
- Lighter and More Flexible Solar Panels: Flexible solar panels are becoming more lightweight and durable, making them easier to install on RV roofs.
- Smart Solar Monitoring Systems: Smart solar monitoring systems provide real-time data on system performance and allow for remote control and troubleshooting.
- Improved Battery Technology: Lithium battery technology is constantly improving, offering longer lifespans and higher energy densities.
The Impact of Solar Power on Sustainable RVing
Solar power is playing a major role in promoting sustainable RVing. By reducing reliance on fossil fuels, solar power helps to minimize the environmental impact of RV travel. It also allows RVers to explore remote locations without disturbing the natural environment.
Government Incentives and Rebates for RV Solar Systems
Many governments offer incentives and rebates for installing solar systems, including RV solar systems. These incentives can help to offset the cost of the system and make solar power more affordable. Check with your local government or utility company for available incentives.
RV Solar Power A Smart Investment for the Future
Investing in an RV solar system is a smart decision that can save you money, enhance your camping experiences, and promote sustainable travel. As technology continues to improve and costs continue to decrease, RV solar power will become an even more attractive option for RVers everywhere.
:max_bytes(150000):strip_icc()/277019-baked-pork-chops-with-cream-of-mushroom-soup-DDMFS-beauty-4x3-BG-7505-5762b731cf30447d9cbbbbbf387beafa.jpg)